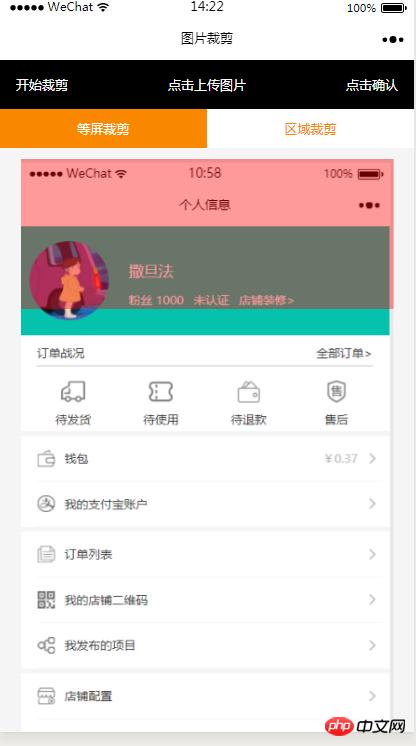
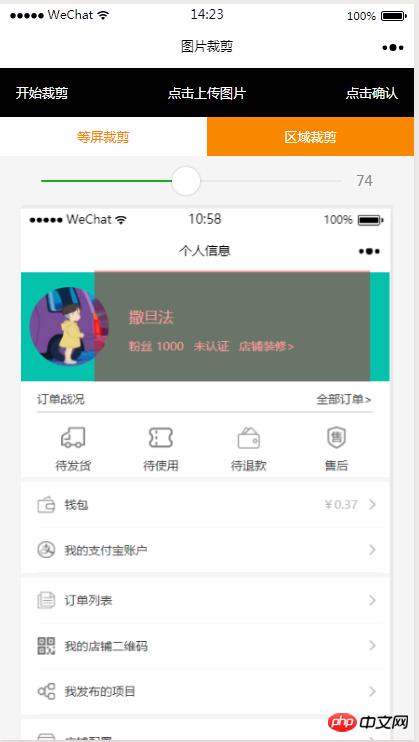
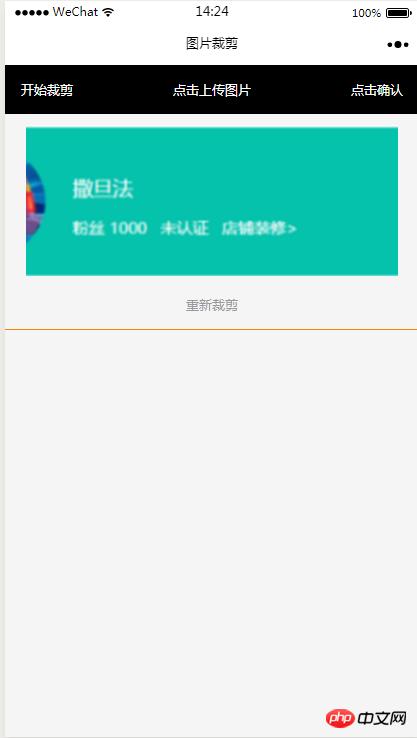
微信小程序图片选择区域裁剪完成办法
[摘要]本篇文章主要介绍了微信小程序图片选择区域屏裁剪实现方法,小编觉得挺不错的,现在分享给大家,也给大家做个参考。一起跟随小编过来看看吧本文介绍了微信小程序图片选择区域屏裁剪实现方法,分享给大家。具体如下...
本篇文章主要介绍了微信小程序图片选择区域屏裁剪实现方法,小编觉得挺不错的,现在分享给大家,也给大家做个参考。一起跟随小编过来看看吧
本文介绍了微信小程序图片选择区域屏裁剪实现方法,分享给大家。具体如下:
效果图


HTML代码
<view class="index_all_box">
 <view class="imgCut_header">
 <view class="imgCut_header_l" bindtap='okCutImg'>开始裁剪</view>
 <view class="imgCut_header_m" bindtap='clickUpImg'>点击上传图片</view>
 <view class="imgCut_header_r" bindtap='okBtn'>点击确认</view>
 </view>
 <!-- 选择裁剪模式 -->
 <view class="selectCutMode" wx:if='{{alreay}}'>
 <view class="selectCutMode_in {{cutType?'selectCutMode_in_act':''}}" bindtap='etcType'>
  等屏裁剪
 </view>
 <view class="selectCutMode_in {{!cutType?'selectCutMode_in_act':''}}" bindtap='areaType'>
  区域裁剪
 </view>
 </view>
 <view class="areaSelct_box" wx:if='{{!cutType && alreay}}'>
 <slider bindchange="areaChange" min="50" max="100" show-value value='{{propor}}'/>
 </view>
 <view class="cutImg_box" wx:if='{{!prienFlag}}'>
 <view class="cutImg_box_t">
  <image src="{{cutImgUrl}}" mode='widthFix'></image>
 </view>
 <view class="clickCutImg_txt" bindtap='againBtn'>重新裁剪</view>
 </view>
 <view class="allCavans" wx:if='{{prienFlag}}' style='width: {{canvasW}}px;height: {{canvasH}}px' >
 <canvas class='canvasSty' style='width: {{canvasW}}px;height: {{canvasH}}px' canvas-id='cutImg' disable-scroll='true' bindtouchmove='canvasMove'></canvas>
 <view class="allCavans_inbg" style='width: {{canvasW}}px;height:{{canvasH}}px; background: url({{img}});background-size: 100% 100%'></view>
 </view>


</view>
CSS代码
.imgCut_header{
 padding: 30rpx;
 display: flex;
 justify-content: space-between;
 align-items: center;
 background: #000;
 color: #fff;
 font-size: 24rpx;
}
.allCavans{
 margin: 20rpx auto;
 position: relative;
}
.canvasSty{
 position: absolute;
}
.cutImg_box{
 width: 100%;

 border-bottom: 2rpx #f98700 solid;
 padding-bottom: 20rpx;
}
.cutImg_box .cutImg_box_t{
 width: 90%;
 margin: 20rpx auto;
}
.cutImg_box image{
 width: 100%;
}
.cutImg_box .cutImg_box_b{
 margin-top: 20rpx;
 width: 80%;
 height: 80rpx;
 line-height: 80rpx;
 background: #f98700;
 color: #fff;
 border-radius: 10rpx;
 text-align: center;
 margin:0rpx auto;
}
.selectCutMode{
 background: #fff;
 display: flex;
 justify-content: space-between;
 align-items: center;
}
.selectCutMode .selectCutMode_in{
 width: 100%;
 text-align: center;
 background: #fff;
 color: #f98700;
 font-size: 24rpx;
 padding: 20rpx;
}
.selectCutMode .selectCutMode_in_act{
 background: #f98700;
 color: #fff;
 padding: 20rpx;
}
.areaSelct_box{
 width: 100%;
 display: flex;
 align-items: center;
 height: 50rpx;
 justify-content: center;
 margin-top: 20rpx;
}
.areaSelct_box slider{
 width: 80%;
}
.cutImg_box .clickCutImg_txt{
 width: 100%;
 text-align: center;
 height: 50rpx;
 font-size: 24rpx;
 line-height: 50rpx;
 color: #999;
}
JS代码部分
初始加载带入上一个页面带过来的参数路径
onLoad: function (options) {
var that = this;
const ctx = wx.createCanvasContext('cutImg');
ctx.setGlobalAlpha(0.4)
var aa = 'https://pintuanqu.oss-cn-hangzhou.aliyuncs.com/Uploads/Picture/goodsShow/20171201/5a2125fc86566.png'<br /> //获取当前屏幕宽度
var phoneW = Number(util.nowPhoneWH()[0]*90)/100;
var cutH = 150;
wx.getImageInfo({
src: aa,
success: function (res) {
var w = phoneW;
var h = (phoneW/Number(res.width))*Number(res.height)
ctx.save()
ctx.drawImage(aa, 0, 0, w, h)
ctx.restore()
ctx.setFillStyle('red')
ctx.fillRect(0, 0, phoneW, cutH)
ctx.draw()
that.setData({
canvasW:w,
canvasH:h,
img:aa,
cutH:cutH
})
}
})
},确定选择区域开始裁剪
// 点击确认裁剪图片
okCutImg:function(){
var that = this;
var canvasW = that.data.canvasW;
var canvasH = that.data.canvasH;
var nowCutW = that.data.cutType?canvasW:that.data.nowCutW;
var nowCutH = that.data.cutType?that.data.cutH:that.data.nowCutH;
var cutX = that.data.cutX;
var cutY = that.data.cutY;
const ctx = wx.createCanvasContext('cutImg');
ctx.setGlobalAlpha(1)
ctx.drawImage(that.data.img, 0, 0, canvasW, canvasH)
ctx.draw()
wx.canvasToTempFilePath({
x: cutX,
y: cutY,
width: nowCutW,
height: nowCutH,
destWidth: nowCutW,
destHeight: nowCutH,
canvasId: 'cutImg',
success: function(res) {
var aa = res.tempFilePath
that.setData({
cutImgUrl:aa,
prienFlag:false,
alreay:false
})
}
})
},红框根据手指移动方法
// 点击红框开始移动
canvasMove:function(e){
var that = this;
var canvasW = that.data.canvasW;
var canvasH = that.data.canvasH;
var nowCutW = that.data.cutType?canvasW:that.data.nowCutW;
var nowCutH = that.data.cutType?that.data.cutH:that.data.nowCutH
var touches = e.touches[0];
var x = touches.x;
var y = touches.y-(Number(nowCutH)/2);
that.data.cutType?x=0:x=x-(Number(nowCutW)/2);
that.setData({
cutX:x,
cutY:y
})
const ctx = wx.createCanvasContext('cutImg');
ctx.setGlobalAlpha(0.4)
ctx.drawImage(that.data.img, 0, 0, canvasW, canvasH)
ctx.setFillStyle('red')
ctx.fillRect(x, y, nowCutW, nowCutH)
ctx.draw()
},上方两个选择裁剪方式的按钮
等屏裁剪
//等屏裁剪
etcType:function(){
var that = this;
var propor = 100;
var canvasW = that.data.canvasW;
var canvasH = that.data.canvasH;
var cutH = that.data.cutH;
var nowCutW = (Number(canvasW)*propor)/100
var nowCutH = (Number(cutH)*propor)/100
const ctx = wx.createCanvasContext('cutImg');
ctx.setGlobalAlpha(0.4)
ctx.drawImage(that.data.img, 0, 0, canvasW, canvasH)
ctx.setFillStyle('red')
ctx.fillRect(0, 0, nowCutW, nowCutH)
ctx.draw()
that.setData({
nowCutW:nowCutW,
nowCutH:nowCutH,
cutType:true
})
},局域裁剪
areaType:function(){
var that = this;
var propor = that.data.propor;
var canvasW = that.data.canvasW;
var canvasH = that.data.canvasH;
var cutH = that.data.cutH;
var nowCutW = (Number(canvasW)*propor)/100
var nowCutH = (Number(cutH)*propor)/100
const ctx = wx.createCanvasContext('cutImg');
ctx.setGlobalAlpha(0.4)
ctx.drawImage(that.data.img, 0, 0, canvasW, canvasH)
ctx.setFillStyle('red')
ctx.fillRect(0,0, nowCutW, nowCutH)
ctx.draw()
that.setData({
nowCutW:nowCutW,
nowCutH:nowCutH,
cutType:false
})
},局域裁剪上方的滑动选择红框根据宽度等比例缩放
areaChange:function(e){
var that = this;
var propor = e.detail.value;
var canvasW = that.data.canvasW;
var canvasH = that.data.canvasH;
var cutH = that.data.cutH;
var nowCutW = (Number(canvasW)*propor)/100
var nowCutH = (Number(cutH)*propor)/100
const ctx = wx.createCanvasContext('cutImg');
ctx.setGlobalAlpha(0.4)
ctx.drawImage(that.data.img, 0, 0, canvasW, canvasH)
ctx.setFillStyle('red')
ctx.fillRect(that.data.cutX 0, that.data.cutY 0,nowCutW, nowCutH)
ctx.draw()
that.setData({
nowCutW:nowCutW,
nowCutH:nowCutH,
propor:propor
})
},重新裁剪回到初始选择图片的页面
// 重新裁剪
againBtn:function(){
var that = this;
var data = that.data
this.setData({
prienFlag:true,
alreay:true
})
const ctx = wx.createCanvasContext('cutImg');
ctx.setGlobalAlpha(0.4)
ctx.drawImage(data.img, 0, 0, data.canvasW, data.canvasH)
ctx.setFillStyle('red')
ctx.fillRect(that.data.cutX 0, that.data.cutY 0, data.nowCutW data.canvasW, data.nowCutH data.cutH)
ctx.draw()
},现在IOS还有个坑就是裁剪不了,官方正在修复不知道什么时候好
以上就是本文的全部内容,希望对大家的学习有所帮助,更多相关内容请关注PHP中文网!
相关推荐:
微信小程序多张图片上传功能的实现
微信小程序实现登录页云层漂浮的动画效果
以上就是微信小程序图片选择区域裁剪实现方法的详细内容,更多请关注php中文网其它相关文章!
微信
分享
小程序是一种不需要下载安装即可使用的应用,它实现了应用“触手可及”的梦想,用户扫一扫或者搜一下即可打开应用。
……


